Delayed surface marker buoys are one of the most important pieces of safety equipment we carry as scuba divers. However, they’re often under-used and a lot of new divers aren’t armed with the knowledge of how to deploy a DSMB. With all the different names for dive floats you might be left scratching your head. If you’re wondering what they’re for and questioning exactly how to use a dive surface marker buoy, we’ve got you!
We’re here to guide you on everything you need to know about SMBs. Read on to learn what a DSMB is for, the difference between SMBs and DSMBs, and what to look for in a delayed surface marker buoy. We’ll also share how you can learn to use one.
What is a marker buoy?
To put it super simply, a surface marker buoy shows that a diver is down. It alerts the surface to exactly where you are in the water. They are any kind of inflatable device which will float at the surface of the water and can be seen either from the shore or the boat. They can be extremely useful in locations with heavy boat traffic, both coastal and inland in lakes.
They’re often brightly coloured or marked with a “diver down” flag, and there are regulations in place to determine how close a boat is allowed to get to a dive float or a DSMB. Generally, you should never be more than 5m away from your own marker. Boats should never get within 15m of an SMB, allowing a 10m buffer zone. However, this distance can vary depending on local regulations.
What’s the difference between an SMB and a DSMB?

The jargon and multitude of names is where it can start to get confusing, especially for new divers. Understanding the acronyms is a great place to start. If you haven’t already worked it out, SMB means “surface marker buoy”. The “D” in DSMB stands for delayed, giving us “delayed surface marker buoy”.
Surface marker buoys are brightly coloured inflatable tubes which can be deployed at the surface to alert people to your position. These are sometimes made of a thin rubber material and designed for emergency use. These types fit easily into a BCD pocket. You’ll often find them in rental BCD pockets, and every diver should know how to use one at the surface.
Diving marker flags or dive floats are also a type of surface marker buoy. In some locations, it’s standard to tow a dive marker float with a diver down flag at the surface for your entire dive. This is usually in shallow coastal locations where there’s a high chance of boat traffic.
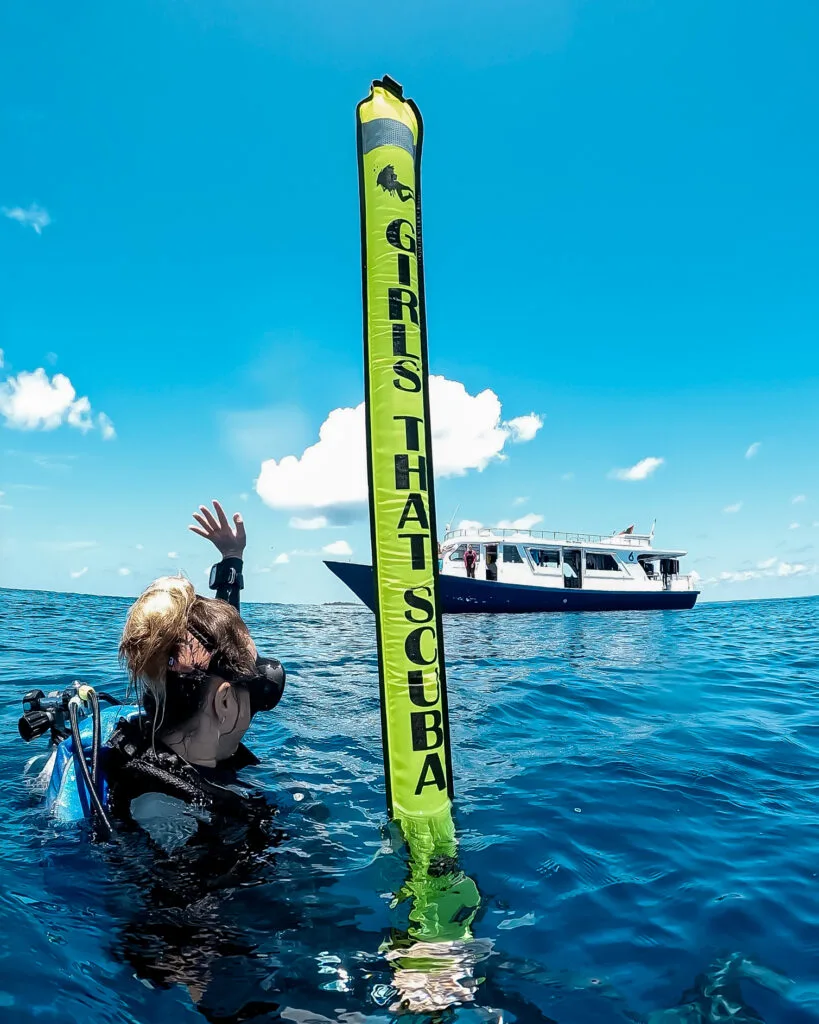
Delayed surface marker buoys are probably the most versatile option for divers. The “delayed” part refers to the fact that they can be put up during your dive (usually prior to completing your safety stop), rather than inflated at the beginning of your dive and towed during it.
You partly fill the DSMB with air at depth in order to send it to the surface, whilst staying connected to it by holding on to a reel. These have some slightly more advanced features than their surface-only counterparts. Read on to learn what features to look for in a great DSMB.
Why should I carry a safety sausage?
Safety sausage is yet another name describing the same piece of equipment. The clue to answering this question is in the word “safety”. Carrying an SMB keeps you safe in a number of different ways. As we’ve already learnt, first and foremost an SMB can protect you from dangerous boat traffic by alerting boats to your presence and, more importantly, letting boats know you’re ascending.
SMBs are also extremely important in locations with heavy current. A diver at the surface can be carried very far very quickly by a current. Having an SMB deployed makes you much more visible and means you can be found quicker in an emergency. Similarly, deploying a DSMB during a drift dive means that a boat or your surface support can follow your location whilst the current is carrying you along.
How do I choose the best surface marker buoy?
There are a few features to look out for in a great DSMB. The easiest way to inflate your SMB is from an open bottom. Look out for a “self sealing” option to ensure the air stays inside on its ascent to the surface. Over expansion valves are a great feature to have. This ensures your SMB doesn’t pop a seam if you accidentally over-fill it with air (which is easily done when you’re first learning).
You should also look for a sturdy material to ensure the seams won’t break easily. An inflation valve is a useful addition. This gives the diver the option of adding air orally or from a low pressure hose, as well as using the open ended bottom to inflate. Reflective panels at the top are also a great safety feature to prioritise.
Finally, check for the attachments which keep the SMB rolled up during your dive. This is usually some kind of combination of bungee cord and velcro. Having both is useful in case the velcro comes undone. You should also have a sturdy D ring (preferably metal) to keep it attached to your BCD when not in use.
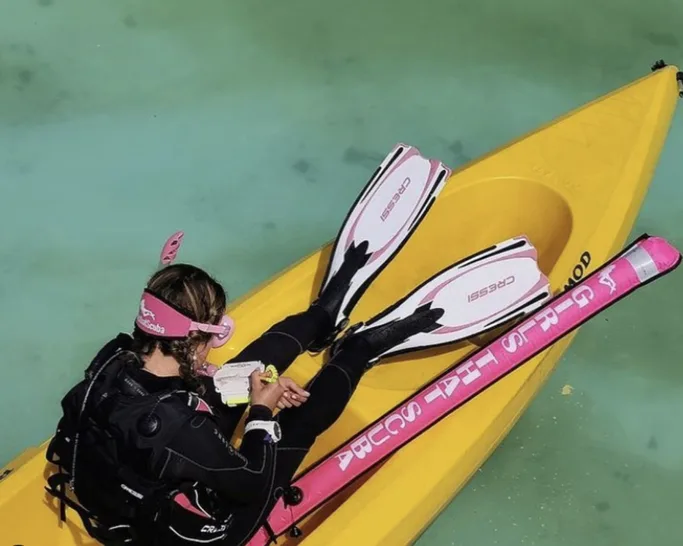
Girls that Scuba DSMB
Luckily for you, we did all the searching for the best DSMB so you don’t have to! Our very own Girls that Scuba DSMB ticks the boxes for all of the features above. Of course, it comes with the great bonus feature of representing GTS whilst you’re using it. Don’t forget you’ll also need a reel and clip/bolt snap to attach to it.

Our DSMB comes in both bright pink and bright yellow. The colour of an SMB can signify different things in different locations, such as yellow signalling an emergency in some areas or in technical diving. Ensure you do your research to get the right colour for you.
Some colours may also fade easier than others, or be less visible against different colours of water. Think murky brown lake vs vibrant blue ocean.
Remember the primary purpose of your SMB is being seen. So as much as we all love matching our scuba equipment, your SMB can be a bright contrast for good reason!
Learning to use a DSMB
Learning how to use a DSMB has been a more recent addition to the Open Water course, however, under PADI guidelines (which is most commonly taught) it’s up to the instructor to decide whether to teach deployment at the surface or underwater. Often, new divers only know how to use an SMB at the surface.
However, it’s important for every diver to learn this skill rather than just relying on a dive professional to have a DSMB. In a situation where you end up separated from a group, it’s important (and potentially life-saving) to let boats know you’re ascending, and how fast you’re moving in a current.
If it wasn’t thoroughly covered in your entry level course, DSMB deployment may be included on a drift dive on your Advanced Open Water course. Some agencies may even offer a specific DSMB speciality course to perfect your skills. Your best approach is to get into contact with a local instructor and discuss with them the easiest way to learn.
They’ll likely teach you in a combination of pool sessions and open water dives. Don’t forget to check out our Girls that Scuba Membership for discounts with hundreds of dive schools around the world!
How to Deploy a DSMB – Top Tips
In the interests of safety, we’ve chosen not to post a step-by-step of how to use a safety sausage. We would encourage you to seek out the guidance of a certified dive instructor as above. However, if you already have the basics down and you’re looking to perfect your SMB deployment here are some tips which you could find helpful.
Buoyancy First
You may find it easier to let a small amount of air out of your BCD before you deploy your DSMB. This will balance out the air which you’ll be putting into the bottom of the SMB. Remember that it’s also easier to deploy an SMB from slightly deeper (think 10-15m, rather than 5-8m).
This is due to the difference in pressure being greater at shallower depth. These pressure gradients make it slightly more challenging to fine tune your buoyancy, and buoyancy is key to a great DSMB deployment.
Air Expands
Don’t forget the first thing you learned about diving physics – air expands as it returns to the surface. Your depth will determine how much air you need to add in to avoid over expanding your SMB at the surface. Air from 10m will be twice the volume at the surface, therefore you need to fill your SMB halfway. From 20m you will only need to fill it one third.
Safety Concerns
We should never attach anything to ourselves whilst underwater, and this rule definitely applies to a deployed SMB. Never clip it to your equipment once it’s been sent to the surface. If you need to be hands free for a moment, you can simply clip off your reel. Use the bolt snap, doubling your line around the top part of the clip, and allow it to float in front of you.
You should also ensure you hold the SMB and reel at arms length away from you as you release it to the surface. This avoids entanglement. Always carry a dive knife or line cutter in case an entanglement does occur.
What top tips do you have for deploying a DSMB? Do you use a DSMB or a dive float where you dive? Let us know in our GTS Facebook group, or share by tagging us @girlsthatscuba on Instagram!